ShopDreamUp AI ArtDreamUp
Deviation Actions


Suggested Deviants


Suggested Collections


You Might Like…


Featured in Groups


Description
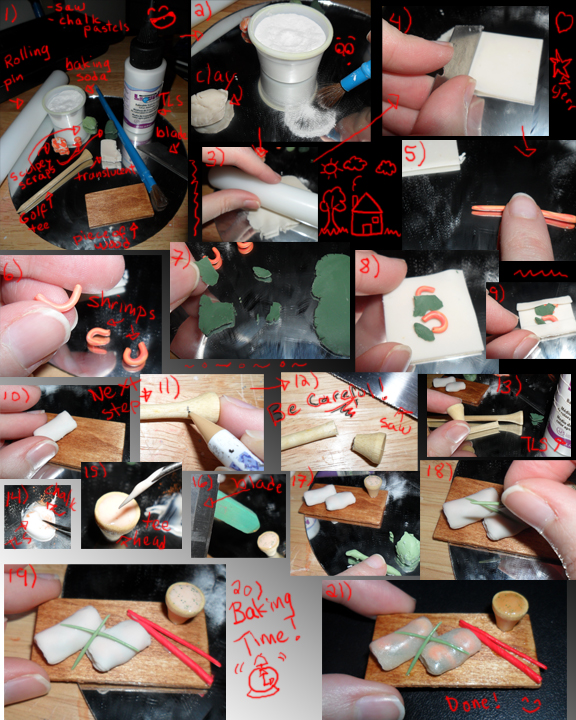
Mini Spring Rolls Tutorial
I was asked by ~SoaringThroughClouds to make a tutorial based on this miniature I made: [link]
So, here’s the steps to make them! (Smile)")
Step #1
You will need:
-A rolling pin (if you have a pasta machine, it’s fine also)
-Baking soda (or any other powder you feel comfortable working with, it’s just to keep the clay from sticking to your work surface)
-An old paintbrush (to spread the baking soda/powder later on)
-TLS (Translucent Liquid Sculpey, or any other liquid clay, TLS is what I use because it’s the only one I can get my hands on, lol)
-Translucent clay (I use Sculpey)
-Orange, light green and darker green clay (I personally used scraps of those colors)
-A knife/blade
-A rectangular piece of wood (or anything you want to put your rolls on)
-Chalk Pastels (or anything you usually use to color TLS)
Now for the “optional” things you will need to make a cup for the sauce:
-A golf tee
-A saw (to cut the tee)
Step #2
Condition a piece of translucent clay, then, with the old paintbrush, spread a bit of baking soda/powder onto your work surface.
Step #3
Roll the translucent clay as thin as possible (the baking soda/powder will keep the clay from sticking to your work surface).
The little drawing of the house you see right next to the picture has absolutely nothing to do with the tutorial, I just felt silly and there was free space there so… lol
Step #4
Cut a square into the translucent clay. You can use a square cutter, but a blade can do just fine.
Step #5
Roll some orange clay into a “snake”. My scraps were good for it because it had a little with in it. Perfect to make shrimps.
Step #6
Cut the roll into small pieces and shape them into shrimps. It really doesn’t have to have details, they will be inside. All you need is the shape and color, really. (Wink)")
Step #7
Roll some dark green (doesn’t need to be very thin), then tear small pieces of it.
Step #8
Now, back with the translucent square. You can now assemble the roll.
Step #9
Fold the top and bottom over your “shrimps”, then the sides (though we cannot see on the picture, silly me).
Step #10
Put a tiny drop of TLS onto the wood piece (plate or platter), then put your roll onto it the way you want, with the “fold” underneath.
You can make another roll if you want.
Step #11 (that’s the “optional” part)
Take your golf tee and mark it at the base of the head.
Step #12
With a saw, CAREFULLY cut the head of the tee.
Step #13
Now you will need some TLS and the tee head.
Step #14
Scrape some pastels into the TLS, but not too much, so it stays relatively transparent. You can use the color you want, this will be the sauce for the rolls. I chose a honey colored chalk pastel. Mix it up with a toothpick or any other tool you like.
Step #15
With the toothpick/tool, drop the “sauce” into the golf tee head you cut on Step #12 (or any other content you chose to use).
Step #16
I chose to scrape some green chalk pastel above the “sauce” to make it look “spicy”. Put a drop of TLS under the “cup” (without turning it over), then put it on your tray with the spring rolls.
Step #17
You can see the cup on the tray in the background. Now, take the lighter green clay and roll some into tiny “snakes”. This will be the decoration on your rolls.
Step #18
Carefully set the “snakes” you made on Step #17 onto your rolls, with a tiny tiny drop of TLS under them so they stick.
Step #19
I cut some red clay (though I did not mention that step, sorry), into chopsticks. You can use painted toothpicks if you want, they make good chopsticks. It adds some colors to the ensemble, don’t you think?
If you want, you can put a magnet under the tray, with TLS, (that’s what I did for that piece).
Step #20
Baking time! Don’t forget to follow the directions of the polymer clay you use for that step.
Step #21
Once it’s out of the oven, wait about 20 minutes, then glaze your piece, it will look much better.
You can now see the final result!")
I really hope you liked that tutorial and that if you do give it a try, that you will share your experience with me!
Comments are always welcomed, good or bad, as well as suggestions!
I was asked by ~SoaringThroughClouds to make a tutorial based on this miniature I made: [link]
So, here’s the steps to make them!
Step #1
You will need:
-A rolling pin (if you have a pasta machine, it’s fine also)
-Baking soda (or any other powder you feel comfortable working with, it’s just to keep the clay from sticking to your work surface)
-An old paintbrush (to spread the baking soda/powder later on)
-TLS (Translucent Liquid Sculpey, or any other liquid clay, TLS is what I use because it’s the only one I can get my hands on, lol)
-Translucent clay (I use Sculpey)
-Orange, light green and darker green clay (I personally used scraps of those colors)
-A knife/blade
-A rectangular piece of wood (or anything you want to put your rolls on)
-Chalk Pastels (or anything you usually use to color TLS)
Now for the “optional” things you will need to make a cup for the sauce:
-A golf tee
-A saw (to cut the tee)
Step #2
Condition a piece of translucent clay, then, with the old paintbrush, spread a bit of baking soda/powder onto your work surface.
Step #3
Roll the translucent clay as thin as possible (the baking soda/powder will keep the clay from sticking to your work surface).
The little drawing of the house you see right next to the picture has absolutely nothing to do with the tutorial, I just felt silly and there was free space there so… lol
Step #4
Cut a square into the translucent clay. You can use a square cutter, but a blade can do just fine.
Step #5
Roll some orange clay into a “snake”. My scraps were good for it because it had a little with in it. Perfect to make shrimps.
Step #6
Cut the roll into small pieces and shape them into shrimps. It really doesn’t have to have details, they will be inside. All you need is the shape and color, really.
Step #7
Roll some dark green (doesn’t need to be very thin), then tear small pieces of it.
Step #8
Now, back with the translucent square. You can now assemble the roll.
Step #9
Fold the top and bottom over your “shrimps”, then the sides (though we cannot see on the picture, silly me).
Step #10
Put a tiny drop of TLS onto the wood piece (plate or platter), then put your roll onto it the way you want, with the “fold” underneath.
You can make another roll if you want.
Step #11 (that’s the “optional” part)
Take your golf tee and mark it at the base of the head.
Step #12
With a saw, CAREFULLY cut the head of the tee.
Step #13
Now you will need some TLS and the tee head.
Step #14
Scrape some pastels into the TLS, but not too much, so it stays relatively transparent. You can use the color you want, this will be the sauce for the rolls. I chose a honey colored chalk pastel. Mix it up with a toothpick or any other tool you like.
Step #15
With the toothpick/tool, drop the “sauce” into the golf tee head you cut on Step #12 (or any other content you chose to use).
Step #16
I chose to scrape some green chalk pastel above the “sauce” to make it look “spicy”. Put a drop of TLS under the “cup” (without turning it over), then put it on your tray with the spring rolls.
Step #17
You can see the cup on the tray in the background. Now, take the lighter green clay and roll some into tiny “snakes”. This will be the decoration on your rolls.
Step #18
Carefully set the “snakes” you made on Step #17 onto your rolls, with a tiny tiny drop of TLS under them so they stick.
Step #19
I cut some red clay (though I did not mention that step, sorry), into chopsticks. You can use painted toothpicks if you want, they make good chopsticks. It adds some colors to the ensemble, don’t you think?
If you want, you can put a magnet under the tray, with TLS, (that’s what I did for that piece).
Step #20
Baking time! Don’t forget to follow the directions of the polymer clay you use for that step.
Step #21
Once it’s out of the oven, wait about 20 minutes, then glaze your piece, it will look much better.
You can now see the final result!
I really hope you liked that tutorial and that if you do give it a try, that you will share your experience with me!
Comments are always welcomed, good or bad, as well as suggestions!
Image size
576x720px 479.99 KB
© 2011 - 2024 kayanah
Comments19
Join the community to add your comment. Already a deviant? Log In
Awesome tut! I'll be making these soon.